Not counted towards your tag license limit.
The SNMP driver can be used to communicate with any device that uses the Simple Network Management Protocol (versions 1, 2c or 3).
Look for SNMP configuration in the Other Tab of the Edit Properties Page. There, the SNMP version must be set to v3 for all options to be displayed.
Driver Errors: To learn more about the cause of an error condition, refer to the Driver Summary Report and the Driver Error Report, both of which are available in the Reports page. The Show Stats button will also provide current and last error messages: Show Statistics Button Widget
SNMP data types influence your selection of I/O tag:
SNMP supports 12 data types. These are passed directly to the I/O tag, where further processing may be required.
- SNMP data types: Integer32, Unsigned32, Gauge32, Counter32, Counter64 and TimeTicks can be used with numeric tag types.
- SNMP data types: Integer(Enumerated), Octet String, Object Identifier, IpAddress, Opaque and Bits should be read in with a String I/O tag, with additional processing done using a Calculation tag as required.
SNMP drivers will commonly connect to UDP on port number 161 or 162, although variations may be found.
VTScada supports only ASCII-encoded MIB files.
Reference Notes:
I/O tags that are configured to use an SNMP driver will have an address selection feature. A button labeled "..." will be added beside the Address field of the I/O tab. Clicking this will open an SNMP Address Select window (Address Assist / Address Select), from which you can choose the correct Object Identifier (OID) address.
The SNMP driver requires more configuration than other drivers. You will need to obtain the MIB library for your device from the manufacturer and you will need to tell VTScada where to find this information. See SNMP Addressing for details and configuration steps. (If the user knows the OID there is no need for a MIB.)
SNMP v3 Security
Legacy applications built prior to the release of VTScada version 12.1 used application properties to configure the authentication and privacy settings. For backward compatibility, you may continue to use these properties, but for new development you are advised to use the configuration properties available in each SNMP driver tag. Both are describe here.
Those not familiar with SNMP v3 security configuration should read SNMP v3 Security Notes before continuing.
For legacy applications relying on properties:
When using version 3, authentication may be done using either HMAC-SHA-96 or the MD5 protocol. Encryption uses either DES or 128-bit AES(1). Choice of protocol is done using the following application properties, found in Settings.Dynamic:
SNMPv3DefaultUserAuthProtocol (Set "0" for MD5 and "1" for SHA-1)
SNMPv3DefaultUserPrivProtocol (Set "0" for DES and 1 for AES128)
(1) If circumstances require that multiple users or security levels be configured, then multiple SNMP drivers can be instantiated. In legacy applications, although one could specify a v3 username in every driver, all drivers share the same pass phrases and authentication / security protocols as specified in the application configuration properties
The following security levels are supported: NoAuthNoPriv, AuthNoPriv, and AuthPriv. There can be only one level per driver instance. When SNMP version 3 is selected, the contents of the Agent tab of the configuration folder change to allow selection of the security level and parameters for the User name and Context Name. The following custom privileges are used to store the configuration: SNMPv3DefaultUserAuthKey, SNMPv3DefaultUserAuthProtocol, SNMPv3DefaultUserPrivKey, SNMPv3DefaultUserPrivProtocol.
For new application development:
New applications should not rely on the parameters just described. Instead, configure each SNMP driver to specify up to three sets of SNMP v3 credentials as required. Security levels can be set to None, Authentication Only, or Authentication and Encryption.
Authentication requires a password and a choice of MD5 or SHA-1 for the protocol.
Encryption requires a privacy password and a choice of DES, AES-128, 3DES or AES-256 for the protocol. Note that DES and AES-128 are both older protocols and may not provide reliable security.
SNMPDriverLegacyV3Notifications. In legacy applications, notifications carrying different usernames were accepted if they had the same credentials. For example, if you had specified three users: User1, User2, User3, then all these users would have the same credentials (the legacy credentials) and were all represented by a default username in the USM data base. Traps carrying any of the three user names were accepted. But, because every SNMP driver now has its own sets of separate credentials, the legacy behavior does not apply unless this property is set.
SNMPDriverOctetStringMaxSize. Specifies the expected maximum size in bytes of OCTETSTRING data to be read by any SNMP driver in the application. This will allow multiple IO tags to be coalesced in a single GET request. If this property is left invalid then no OCTETSTRING GET requests will be coalesced.
Cautions:
- Using the same user name but different passwords for both GET_SET and TRAP in the same SNMP driver, or different SNMP drivers that connect to the same remote agent, may conflict and lead to unpredictable behavior.
- INFORMs credentials set in any driver might conflict with VTScada’s SNMPAgent GET and SET credentials and lead to unpredictable behavior.
- INFORMs credentials set in a SNMP Agent Destination tag may conflict with GET / SET / TRAPs credentials specified in one or multiple SNMP drivers
- If using an SNMP driver with a Driver Multiplexer, note that traps do not count towards driver communication status or RecommendAlternate behavior. The SNMP driver must have one or more polling tags attached to ensure proper behavior.
- If your system has multiple servers, you may find it helpful to increase the value of SNMPFailoverCount, or set NoSoftDriverFailure. In some situations it is possible that when switching servers, a number of errors can occur that is sufficient to trigger Recommend Alternate.
Many application properties relate to the SNMP driver. Refer to Communication Driver Properties
The ID tab of every tag includes the same common elements: Name, Area, Description, and Help ID.
Name:
Uniquely identifies each tag in the application. If the tag is a child of another, the parent names will be displayed in a separate area before the name field.
You may right-click on the tag's name to add or remove a conditional start expression.
Area
The area field is used to group similar tags together. By defining an area, you make it possible to:
- Filter for particular tag groups when searching in the tag browser
- Link dial-out alarm rosters to Alarm tags having a particular area
- Limit the number of tags loaded upon startup.
- Filter the alarm display to show only certain areas.
- Filter tag selection by area when building reports
When working with Parent-Child tag structures, the area property of all child tags will automatically match the configured area of a parent. Naturally, you can change any tag's area as required. In the case of a child tag, the field background will turn yellow to indicate that you have applied an override. (Orange in the case of user-defined types. Refer to Configuration Field Colors)
To use the area field effectively, you might consider setting the same Area for each I/O driver and its related I/O tags to group all the tags representing the equipment processes installed at each I/O device. You might also consider naming the Area property for the physical location of the tag (i.e. a station or name of a landmark near the location of the I/O device). For serial port or Roster tags, you might configure the Area property according to the purpose of each tag, such as System or Communications.
You may define as many areas as you wish and you may leave the area blank for some tags (note that for Modem tags that are to be used with the Alarm Notification System, it is actually required that the area field be left blank).
To define a new area, type the name in the field. It will immediately be added. To use an existing area, use the drop-down list feature. Re-typing an existing area name is not recommended since a typo or misspelling will result in a second area being created.
There is no tool to remove an area name from VTScada since such a tool is unnecessary. An area definition will exist as long as any tag uses it and will stop existing when no tag uses it (following the next re-start).
Description
Tag names tend to be brief. The description field provides a way to give each tag a human-friendly note describing its purpose. While not mandatory, the description is highly recommended.
Tag descriptions are displayed in the tag browser, in the list of tags to be selected for a report and also on-screen when the operator holds the pointer over the tag’s widget. For installations that use the Alarm Notification System, the description will be spoken when identifying the tag that caused the alarm.
The description field will store up to 65,500 characters, but this will exceed the practical limits of what can be displayed on-screen.
This note is relevant only to those with a multilingual user interface:
When editing any textual parameter (description, area, engineering units...) always work in the phrase editor. Any changes made directly to the textual parameter will result in a new phrase being created rather than the existing phrase being changed.
In a unilingual application this makes no difference, but in a multilingual application it is regarded as poor practice.
Help Search Key
Used only by those who have created their own CHM-format context sensitive help files to accompany their application.
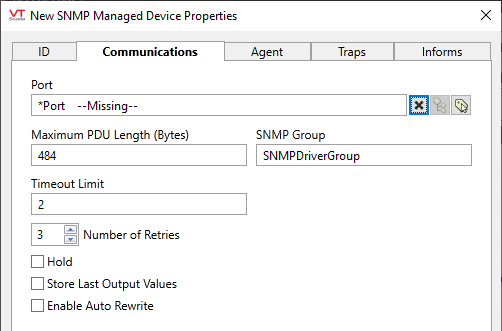
SNMP Driver properties, Communications tab
Use the Communications tab to select the port through which this driver will communicate as well as options for handling communication errors. In addition to the port parameters, this tab provides a location for you to specify the name of the SNMP group to which this driver instance will belong.

Port
Use the tag browser button to select the TCP/IP or UDP port tag to which the remote equipment is attached. The X button can use used to clear the current selection.
Maximum PDU Length (Bytes)
Use to specify the maximum length, as measured in bytes, of the Protocol Data Unit. This value is based on the smallest MTU![]() Maximum Transmission Unit along the path to the equipment and need only be changed from the default if a different value is required by the equipment with which you will be communicating.
Maximum Transmission Unit along the path to the equipment and need only be changed from the default if a different value is required by the equipment with which you will be communicating.
SNMP Group
The name of a VTScada RPC service to which this driver instance will belong. Alternate RPC services need only be created if your application uses multiple servers on separate sub-nets. In most applications you should leave the default value for this field.
Time-Out Limit
In the event that a connection cannot be made, sets the number of seconds until another attempt will be made.
Retries
The number of times to retry a message before declaring an error.
Use only if the driver is connected to a device that uses a serial port or a UDP/IP port that is configured to be polled. When connected directly to a device using TCP/IP, this value should normally be set to 0 since TCP/IP is a guaranteed message delivery protocol.
For unreliable communications, such as radio, set to 3 or 4.
Hold
Select this to have I/O tags attached to the driver hold their last value in the event of a communication failure. If not selected, tags will have their value set to invalid on a communication failure.
Store Last Output Values
When selected, the driver will maintain a record of the last value written to each output address. This may be useful in at least two situations:
- For hardware that does not maintain its state during a power loss and must be restored to that state when re-started.
- When failed hardware is replaced by a new device and you would like to start that device with the values last written to the old one.
If the last output values are stored, they may be re-written by either of two methods:
- Automatically, when communication is restored to the device.
- Manually by way of a button press. See, Rewrite Outputs Widget for details.
Changing this value from selected to deselected will cause all stored values to be erased immediately.
If this driver is being used in conjunction with a Driver Multiplexer, then configure the Driver Multiplexer to store the last values, not the drivers connected to the Multiplexer. In this case, only the Multiplexer should be configured to re-write automatically.
Enable Auto Rewrite
If selected, the Store Last Output Values option will also be activated. This option causes the driver to rewrite the last value written to each output, in the event that communications are lost and then restored.
Use this option only if you are certain that you want the last values to be rewritten automatically after an interruption in driver communications.
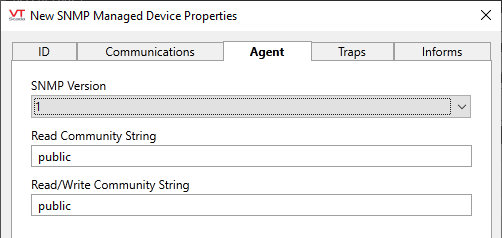
SNMP Driver properties, Agent tab
Provides configuration options related to the SNMP device with which this driver will communicate.

Format for SNMP 1 and 2c.

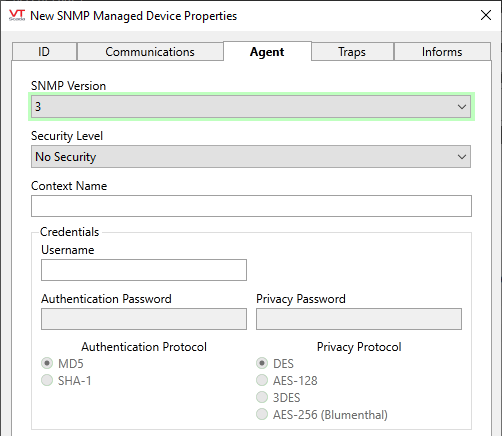
Format for SNMP 3
SNMP Version
Select the simple network messaging protocol version that the agent is using. Supported versions include 1, 2c and 3. Defaults to 1. Selecting version 3 will cause the available configuration parameters to change as shown
(v1 & v2c) Read Community String
Used for authentication of the device. The default value of "public" should have been changed on the device in the interest of improved security.
(v1 & v2c) Read/Write Community String
Similar to the Read Community String, this value is used to authenticate an SNMP device that will be used to both read and write information. Like the former, this value should be changed on the device from the default of "public".
(v3) Username
The name required for authentication.
(v3) Context Name
A context is a collection of information accessible by an SNMP entity. A SNMP Engine may contain one or more contexts, where the default context has an empty name. Information is not constrained to a single SNMP Engine ID or context. The same information can be available via different means. A context is used to define information subsets. For example, an SNMP Engine exposed to this driver might contain multiple components, each of which implements MIB items that may have conflicting OID info. The concept of a context was introduced to avoid this ambiguity. For simple devices the default context is sufficient.
(v3) Authentication Password
The user name, authentication and privacy protocols and passwords are created and set in the equipment and provided to the user. The authentication allows the equipment to verify that it is, in fact, the privileged user who is Getting or Setting SNMP data via the SNMP driver. Privacy protocols and credentials allow encryption of the data exchanged between the driver and equipment.
(v3) Authentication Protocol
Authentication protocol to use. Choose between MD5 and SHA-1
(v3) Privacy Password
Privacy password associated with the given user name.
(v3) Privacy Protocol
Privacy protocol to use. Choose between DES, AES-128, 3DES or AES-256 (Blumenthal)
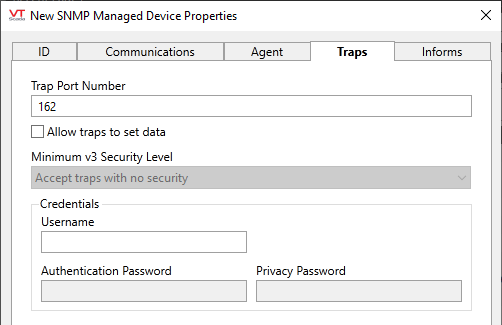
SNMP Driver properties, Traps tab
In general, it is recommended that the Allow Traps option be disabled unless explicitly required.
Used to specify the port on which the driver will listen for unsolicited (Trap) messages. The intended purpose of Traps in SNMP is to notify the network management service so that it can investigate as required. They are not intended to set data because doing so represents a weak point in security (although, many devices use Traps to do exactly that). Traps typically contain messages such as a timestamp and an event OID such as a device restart.
The port number defaults to 162. Should not match the local or the remote port number.
You may set the port number to zero (0) to prevent the SNMP driver from accessing the port. This may be useful in the case that the driver should not open a port or receive traps.

The following notes are for SNMP version 3 only:
Additional configuration options, within the Trap Data block will be enabled when SNMP v3 is in use.
When filtering for a specific SNMP user, check that the minimum security level is set as required. Note that the user/security-level/context setup on the Agent tab is for commands (Get/Set/GetBulk) and has no effect on traps.
Security levels available when SNMP v3 is in use include:
- Accept traps with no security
- Only accept authenticated traps.
- Only accept authenticated and encrypted traps.
SNMP Driver properties, Informs tab
The authentication password field is enabled only when the security level is set to at least Authentication Only. The Privacy Password field is enabled only when the security level is set to Authentication and Encryption.
For authentication and privacy of Gets, Set and Traps, credentials are defined and created on the equipment side and then provided to VTScada. For Informs, the authentication and privacy credentials are created in VTScada and then provided to the equipment side.
Security levels are set within the Agent tab.
The following widgets are available to display information about your application’s SNMP driver tags:
