Any property can be assigned a value that will apply only to the instance of VTScada running on a specific workstation. You might use this feature to set display properties or security features that will be in effect only for a given workstation. Workstation-specific properties are mandatory when configuring Tag Area Filtering or Alarm Area Filtering. And, in combination with expressions, these can also be helpful for certain driver configurations such as Modbus Plus PLC addressing, where the link path to a device can vary from server to server.

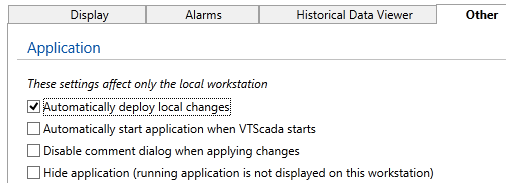
Workstation-specific properties in the Application Configuration dialog, Other tab
You can create a workstation-specific version of any property, not just the four shown here. Workstation-specific properties are stored in a file named after the workstation where they will apply and having an extension of either .Startup or .Dynamic. These are located in the WorkstationSettings sub-folder of your application.
The Application Configuration dialog will add properties only to the .Dynamic file. Any property that belongs in .Startup must be added using a text editor and then the changes imported. (Import File Changes Tool)
Existing properties in either file can be changed using the Application Configuration dialog.
Not for Thin Clients
Workstation-specific settings are valid only for computers with VTScada installed. For thin client connections, the name of any remote machine making a client connection cannot be known. You cannot create a workstation-specific setting for any thin client connection.
You can, however, create workstation-specific settings for all Internet client connections to a specific VTScada Thin Client Server by designating the name of the computer hosting the VTScada Thin Client Server. This may be especially useful if you have one server for Internet connections from within your trusted network and another in a DMZ (demilitarized zone) for connections from the Internet in general and you wish to have separate rules for each.
On a related theme, if you want to set display properties that apply only to thin clients, consider one or more Realm Display Setup Tags

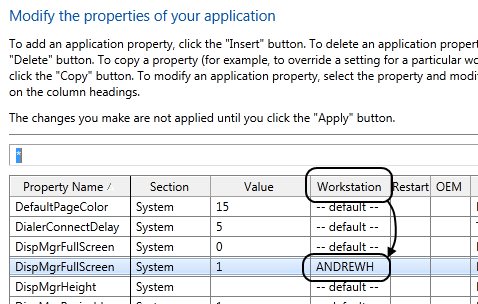
In this example, the setting for the variable, DispMgrFullScreen will apply only to the VTScada installation running on the workstation, ANDREWH. (DispMgrResizable must also be set to 0.)
Workstation-specific properties are stored in files named after the workstation to which they apply. For the example given, there will be a file named, "ANDREWH.Dynamic" in the sub-folder, "WorkstationSettings". (C:\VTScada\BedfordScada\WorkstationSettings\ANDREWH.Dynamic")
The structure of the Workstation files is identical to that of the Settings.Startup and Settings.Dynamic files. All of the same rules for section names, comments, etc. apply.
Workstation-specific properties for hidden sections
Properties stored in hidden sections cannot be created or modified using the Application Configuration dialogs. You must work directly in the Settings.Dynamic file for these.
As an example, perhaps you wish to set the propertyRemoteAuthMethodsDisallowed to "usernamepassword", but only for a VTScada Thin Client Server located in your organization's DMZ. The process is simpler if you already have at least one workstation-specific property defined for that machine. Therefore, the recommended process is as follows:
- Use the Application Properties page to insert a new property with a name that does not match any existing property. (Perhaps, "nada".)
- When defining this property, set the workstation to the name of the machine where you want create a workstation-specific hidden property.
- Upon saving the new property, the WorkstationSettings folder will be created and a workstation-specific version of the Settings.Dynamic file will be created within it.
You could rename this to .Startup if the property you are setting loads only on application restart. - Open this file with a text editor and add the appropriate hidden-section label and the properties with values for that workstation.
- Optionally, delete the property you created in step 1 of this process.
- Use the Import File Changes button in the VAM to import the updated version.
