Module Content Window 
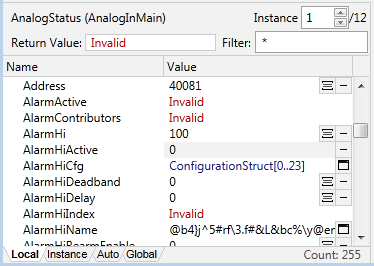
The lower left portion of the screen is occupied by the Module Content window. The content is linked directly to the selected module in the Module Tree window. At the top edge of the window you can see the name of the module being examined and the specific instance. Step through the instances using the arrows provided.

Use this window to examine the current value of variables, constants, parameters, and declared submodules. You can also set values for variables, parameter values for launched objects or objects running as subroutines. You cannot set parameters for called objects, variables set in steady state or object values. Setting a value will affect the current running instance but not change underlying code - the next time the module runs values will be assigned normally. Use this feature to experiment with "what-if" scenarios, simulate user-input, or advance a counter.
The list can be sorted alphabetically using the Sort Data button in the toolbar. At times, the list may be easier to use when not sorted. For example, when viewing tags, the Name property will be first in the unsorted list, whereas you would need to scroll to find it in the sorted list.
If the module has a Return() statement, you can view (and set) the value that will be returned. Typically, you would use this window in combination with break points to examine values at selected points during execution. Breakpoints and Data Breakpoints.
Filter Data in the Module Content Window
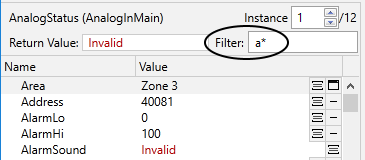
You can filter the variable list being displayed in the module content window as follows. Note that the filter refers to variable names, not values.
- Enter a filtering condition in the Filter field in the module content window.
(e.g. To view all variables whose name begins with "a" you could enter a*). - Press the Enter key.
The module content window will display only those objects that meet the filtering condition.

To clear the filter, use the clear (x) button or clear the input in the Filter field and press the Enter key.
Buttons within the display
Buttons to the right of each entry in the list will vary according to the type of that value.
Toggle display formats. For most numeric values you can toggle the display between decimal, hex, octal, or timestamp.
Open a pop-up window. (See following example image)
If the variable points to another module or contains complex data such as an array, structure or dictionary, a window button can be clicked to open a pop-up dialog with detailed information about the contents of that variable. Tools within this window allow you to expand or collapse all nodes, enable or disable automatic refreshing of the displayed values, change the displayed format for all values, and filter for specific values and for keys in dictionaries.
Value pop-up window showing an array. Dictionaries are similar.
Navigate to submodule. Click this button to navigate to the module named in the associated variable in both this window and in the module tree. This is equivalent to using the Forward button in the toolbar.
Double-clicking a variable is equivalent to using both the window button and the forward button, as described in the previous two items.
Open Metadata window. Similar to opening a pop-up window for other types, this symbol is used expressly for variables with metadata.
Notes and examples for metadata can be found after the following example image of a value pop-up window.
Metadata
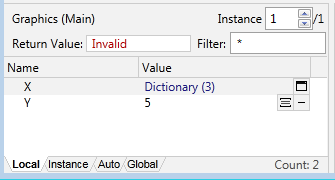
If the variable contains metadata, a  button will be provided, which you can click in order to view that metadata. The metadata button should not be taken as indicating whether a variable is a dictionary. For example, a dictionary created with several name/value pairs, but without a root value, will not have a metadata button.
A value in VTScada has properties, other than just its value. By resting the mouse pointer over a value in the module content window, a tool tip window is displayed for several seconds, listing the properties of the selected value. For example:

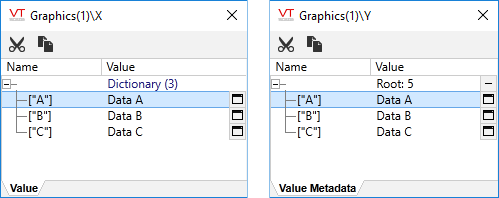
The rules for how dictionaries are displayed in the module window can be confusing if the dictionary has a root value. The following example may help:
Given the following code that creates two dictionaries, where the first has no root value and the second has a root value of 5: (*)
  If Watch(1);
  [
    DemoDictA = Dictionary();
    DemoDictA["A"] = "Data A";
    DemoDictA["B"] = "Data B";
    DemoDictA["C"] = "Data C";

    DemoDictB = Dictionary(1, 5);
    DemoDictB["A"] = "Data A";
    DemoDictB["B"] = "Data B";
    DemoDictB["C"] = "Data C";
  ]
The module content window will look like the following:

Hovering over each of the variables in turn will produce tool tips as shown next:

Note that only DemoDictB, which has a root value as well as metadata gets a metadata button.
DemoDictA gets the Window button, which in this case performs a somewhat similar function…

(* Note that root values are not common and should be used with caution. The preceding example shows how the Source Debugger works, not recommended practice for dictionaries.)
Tabs:
Local:
Displays only the variables and values that are local to the selected object or module. Values from parent objects that may be within the scope of the selected module are not shown.
Instance:
If a module has retained variables (which are persisted, instance-specific variables) and those variables have valid values, then these will be displayed in the Instance tab. As you cycle through the instances with the "Instance" spinbox, any different values are displayed.
Auto:
Referring to the Code Display window, this tab shows variables and values near the selected line of source code. (Near is defined as one source code line before and one after the selected one.) This is most useful when single-stepping through lines of code. Values are refreshed automatically as you step through the code.
Global:
Shows all variables and values within the scope of the selected object or module.
