Step Buttons
Meaning, "a button that will increase (or decrease) a value by 1". VTScada does not include a step button widget, but you can easily create your own. In addition to the widget, you'll need two Multi-Write Tags that you will create as children of the output tag for which you want to add step buttons. Multi-write tags do not count against your license.
Preparation:
An I/O tag that writes an analog value, and for which you want to add step buttons.
This example uses the High Level Setpoint tag, found in the V12.1 Training Simulator.
Part 1. Create two MultiWrite tags:
- Add a MultiWrite tag as a child of your I/O tag.
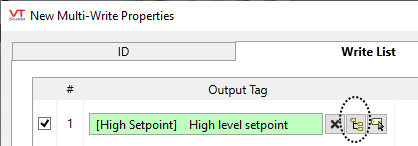
In this example, it is named Step Up. - In the Write List tab of the MultiWrite, select the parent tag.
The purpose of the next two steps is to make this tag generic, so that it can be copied to any output tag where it will work without additional configuration.
- Select the path button (circled with a dotted line in previous image).
- Select the option, Ancestor Relative Path.

The path should now read [..\*Numeric], followed by the description of the tag you are using as the parent. - Click once in the Value column.
- Select the option, Expression.
- Open the expression editor.
-
Enter [..\*Numeric] + 1 then select OK to save your work.

- Apply your changes and close the tag configuration dialog.
- Copy Step Up
- Paste it as a child of the High Setpoint, I/O tag, changing the name to Step Down
- Edit the properties of Step Down to change the expression to subtract 1 instead of adding.
[..\*Numeric] - 1
Step Up and Step Down can now be copied as children of any output tag for which want to add Step Buttons. The link to the new parent will be automatic thanks to the use of Ancestor Relative Path.
The next set of steps will create the basic output control plus two step buttons and save them as a widget for re-use.
Part 2: Create a Widget:
- Draw the output tag as a Numeric Entry widget.
- Adjust the appearance of that widget as you see fit but do not select a font for the label and do not provide a title.
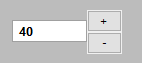
- Draw Step Up as a MultiWrite Button, placing it beside the Numeric Entry.
- Change the label of the button to +
- Draw Step Down as a MultiWrite Button, placing it below the button for Step Up.
- Change the label of the button to -
- Adjust the appearance as you see fit.
- Group as a Tag Widget.
In this example, the widget is named Step Controls.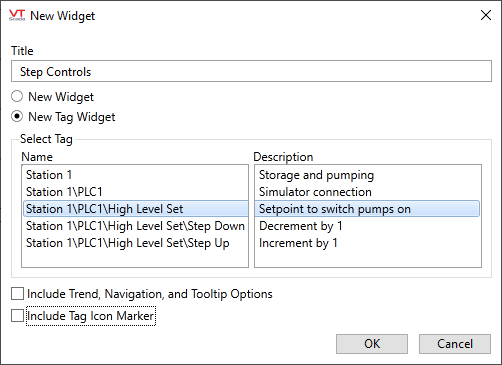
- Ensure that the default tag selection is the original output tag.
If not, then ensure that both step controls are linked to MultiWrite buttons that are children of that tag and that no widget is configured to use a font or any other identifiable tag. - Select OK to finish.
- Open the properties of the new widget.
- Select the Disable Trend option.
Suggested Enhancement: Add text to the widget as a label. Use Linked Tag Properties so that the text shows the ShortName of the output tag.
