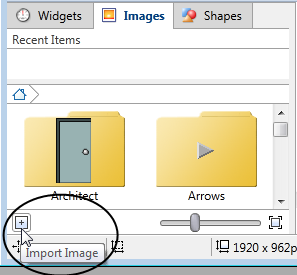
Even though several thousand images are included with every copy of VTScada, it is likely that you will want to use your own images from time to time.
• You can create new folders for your imported images (described following). Doing so will help you keep those images organized.
• No image may measure more than 10,000 pixels on either side.
You should keep your images as small as possible in terms of overall pixels. Most VTScada images are less than 200 pixels wide or tall. Larger images will slow the response time of your pages.
Folders can be created using the same dialog box that opens when importing an image, as described in the following steps.
Palettes and the items within them such as images and folders, are organized and stored in Menu Item Tags. The following steps will therefore refer to menu items. The same result can be obtained by starting with the Tag Browser where menu items can also be created, edited, and shuffled using Menu Item entries in the Tag Browser.
Note that you can select multiple tags in the Tag Browser's main window by holding down the Ctrl key while selecting. Use this to copy, move, or delete several tags at once.
* VTScada recognizes the following image formats: .BMP, .CUT, .PCX, .EMF, .WMF, .JPG, .PNG, .TIF
To import an image, Method 1:
- Open the Images palette of the Idea Studio.
- Open a folder for the image to be imported.
- Click the Import Image button.

The New Menu Item Properties dialog will open.
It is at this point that you could choose to create a new folder before repeating the steps to import images to that folder. - Click, Image in the New Menu Item Properties dialog.
The Import Image dialog will open. - Browse for and select the image to be imported.
The New Menu Item Properties dialog will display a preview of the image, and its properties. - Click OK.
The image will be added to the open folder.
To import images or a folder of images, Method 2:
- Open the Images palette of the Idea Studio.
- Within the palette, open a folder for the image or images to be imported.
- Open Windows Explorer and find the image or images that you want to import.
Note that you may select multiple images, or a folder of images.
If you select a folder, VTScada will attempt to create a matching folder within the palette before importing the images. - Drag the image from Explorer to the palette.
The New Menu Item Properties dialog will open. In most cases, there is no need to change any parameters within this dialog. - Click OK.
The image will be imported and added to the current folder at the bottom of the list.
Method 2 works equally well if you drag the image to the editing canvas rather than to a palette folder. The difference is that the image will be saved to the folder, "Imported Images" instead of a folder of your choice.
Remember that you can edit the Images palette as you see fit.
Troubleshooting:
- The image is not visible after being imported.
It may be necessary to scroll through the images of the current folder to find the one you imported.
- The image is in the wrong folder.
Use the Tag Browser to reorganize the palette.
Note that you can select multiple tags in the Tag Browser's main window by holding down the Ctrl key while selecting. Use this to copy, move, or delete several tags at once.
