Image Formatting
Any image that you have added to a page can be modified to suit your purpose. Beyond the usual display and alignment tools, all of the following can be used to adjust images. In all cases, the original image appearance can be restored by clicking the Reset tool. Formatting options change how an instance of the image is displayed. They do not change the image file.
Images have no "Link" option to tie them to a tag. They are essentially static, although any property (movement, scaling, etc.) can be animated by linking that property to a tag value or to an expression.
The Style Settings tag has no effect on images and should not be linked to any property.
For information about accessing image properties and linking them to tag values, see: Adjust Image Dialog
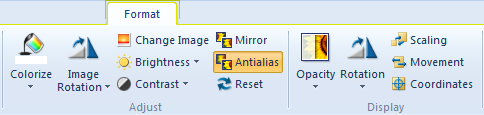
Image formatting options
Color Replace
(Properties dialog only) Relevant only if the image includes a color indicator patch, or if within an Image Change widget, you have selected the No Image option. Color indicators within images are areas of Active Orange.
Change Image
Opens the Select Image palette, from which you can select a new image to replace the one being used. Other formatting commands that had been applied to the original image will remain in effect for the new one.
VTScada recognizes the following image formats: .BMP, .CUT, .EMF,. JPG, .PCX, .PNG, .TIF, .SVG* .WMF
Using .SVG images comes with the following considerations:
• SVGs are resource heavy! They are slower to draw than other image types and roughly twice as costly as .PNG and .JPEG. They are intended for images that must scale without loss of resolution. Reconsider your file type if the image is larger than 1MB or will be redrawn often.
• Animated SVGs are not supported.
• Only elements supported by Microsoft Direct2D are supported. Unsupported elements won't load.
• .SVG images are only supported on Windows 10 version 1703 and up. In applications running on earlier versions of Windows, .SVG images won't load.
Similar to contrast, rotate and other controls.
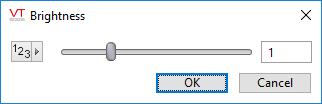
Adjust the brightness of the image using one of the pre-set values or click Custom to open a slider. Brightness can be adjusted up or down. A value of 1 (one) uses the image's original brightness. Possible values range from zero (black) to four (white).
Increase or decrease the difference between bright and dark shades within the image. At higher contrast, bright shades become brighter and dark shades become darker, making certain details easier to distinguish up to a point. At very low contrast, all shades approach a uniform intensity within each hue. Values range between zero and four, with one being the image's original contrast.
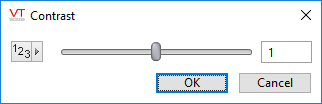
Both the brightness and the contrast dialogs include a data source button (left of the slider), which advanced developers can use to tie the property to a tag value or expression, thereby making the object change in response to operating conditions.
Many images in the library are provided as in a plain, gray-scale format. You can use this to add vibrant (or other) color. Indicator lights, found within various widgets, make use of this technique to allow a plain gray disk to appear as a glowing red or green lamp.
With the Colorize sub-menu, you can select one of the preset colors to quickly add a tint, or you can open the Select Color dialog to gain access to the full range of options for applying tint, hue, saturation, opacity, and other features.
When creating your own gray images, use color #888888 for best results. Gradients based around this shade will also work well.
Mirror
Flips the image from left to right. There is no vertical mirror option.
Anti-alias
Causes images that have jagged edges to appear to have smoother lines.
Image Properties Dialog
You can also modify an image using its properties dialog. This has links to all of the tools found in the ribbon, plus one: The Tile and Scale Factor option.
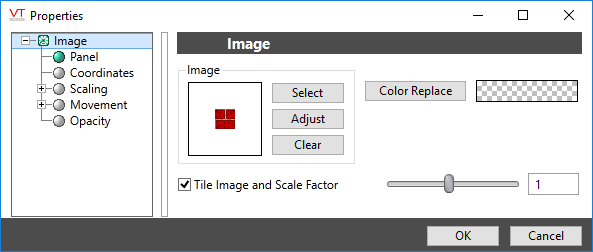
Image Properties dialog
While any image can be tiled, this option is intended for use with backgrounds such as water, wood, stone and metal. When the Tile option is selected, the details show at their original size, and the image is cropped or repeatedly tiled to fill the area you have specified.
If the Tile option is not selected, the image is scaled to fit the specified area.
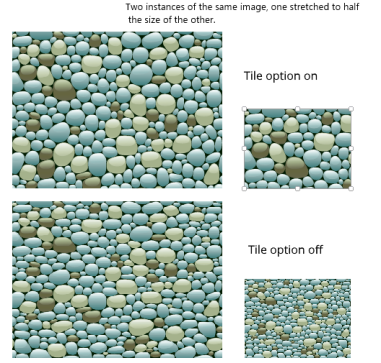
Scaling images with the tile option on versus off
