VTScada as a Network DDE Client
DDEShare is based on NetDDE. For security reasons, Microsoft stopped distributing this product for versions of Windows® following XP. If you choose, you may still be able to find and install NetDDE for your version of Windows. The instructions for doing so are beyond the scope of this document.
DDE is an older technology and is not supported by every newer feature of VTScada. In particular, there is no support for linking to child tag data through DDE. Only tags at the root level may be linked successfully
When VTScada is a network DDE client, data can be entered in the cell of an Excel spreadsheet, and the value will be reported as the value of a tag in VTScada.
Five tasks must be completed to configuring VTScada as a network DDE client.
- Configure a new DDE share object using the DDEShare utility.
- Configure a new DDE Client tag within your VTScada application to communicate between VTScada and the external application with which you wish to share data.
- Select or create an output tag within your VTScada application to write data to the external application.
- Select or create an input tag within your VTScada application to read the data that you are writing to the external application to ensure that communications are occurring as they should.
- Configure an Excel spreadsheet of the same name specified in your DDE share object, and ensure that the path to the file is correctly configured within Excel for VTScada to locate it.
The steps for each task follow. DDE Share screen-shots were created using Windows XP, the last version of Windows that included native support for this technology. Your screens may differ.
Part 1: Configure a New DDE Share Object Using DDEShare
To designate VTScada as a DDE client, you must first configure the network DDE on the server PC using the DDEShare utility. The following instructions will guide you through the correct process of configuring DDEShare.
- Obtain and install a copy of NetDDE.
- Open the Windows Start menu.
- Enter "DDEShare" in the Search for Programs and Files field.
- Click OK. The DDE Share dialog opens.
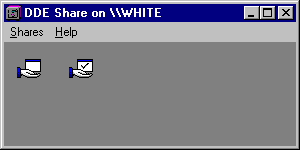
- Double-click the icon that does not display a check mark. The DDE Shares dialog opens similar to the following:
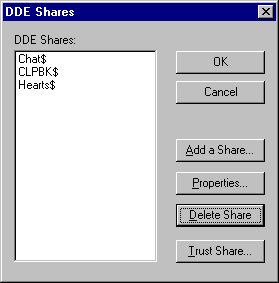
- Click the Add a Share button. The DDE Share Properties dialog opens as shown.
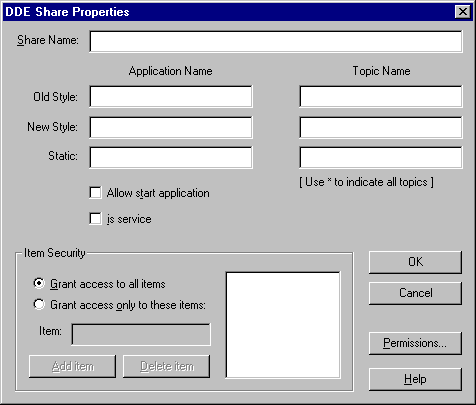
- Enter a unique name for the share item in the Share Name field followed by the dollar sign character ($) (e.g. "DDEShare$"). (The Share Name will not accept duplicates any of the names of existing shares in the DDE Shares dialog.)
- Enter the application name and topic name in the Old Style and New Style fields as shown in the next image.
- Select the Allow start application check box. The DDE Share Properties should appear similar to the following:
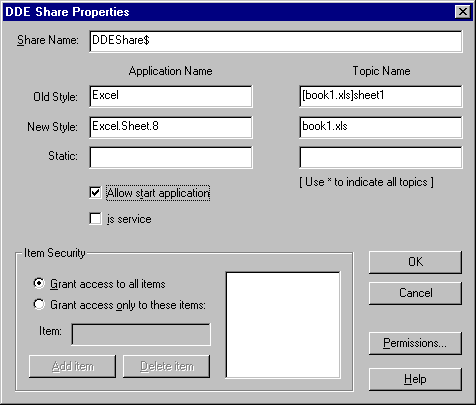
Observe the example settings shown in the DDE Share Properties dialog above: "book1.xls" identifies the name of the Excel workbook into which the data will be placed. This can be substituted for any Excel workbook name you choose. "Sheet1" is the name of the Excel sheet that the DDE Share is going to access within the selected Excel workbook. You may enter any sheet name you choose, as long as the sheet exists within the specified Excel workbook. Finally, select the "Allow start application" check box to enable VTScada to start Excel and open to the correct sheet in the specified workbook.
- Click the Permissions button. The DDE Share Name Permissions dialog opens as shown, and displays the names of the current users and groups.
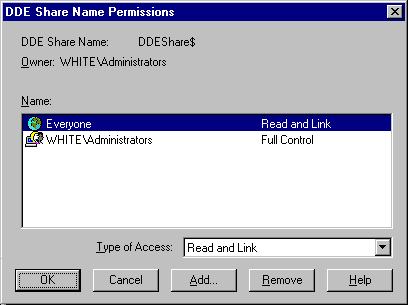
- Select any local or domain users that you to grant access to the new share, and select an appropriate option from the Type of Access drop-down list. If security is not an issue, you may wish to select "Everyone" and set the Type of Access to "Full Control". This will ensure trouble-free connectivity (as far as new users on the network are concerned). A second option might be to create a new group and grant the group permission to access the new share. You can later enable new users to access the share simply by adding them to the group.
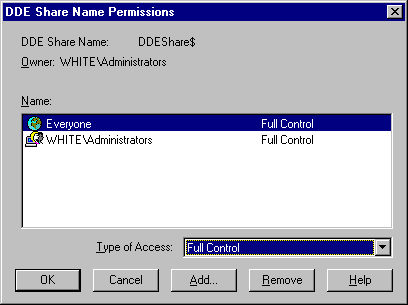
- Click OK. You are returned to the DDE Share Properties dialog.

- Click OK. You are returned to the DDE Shares dialog where the name of the new share is added to the list.
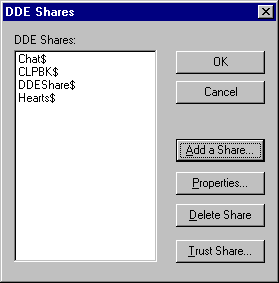
- Select the new share in the DDE Shares list. The new share is highlighted.
- Click the Trust Share button. The Trusted Share Properties dialog opens as shown.
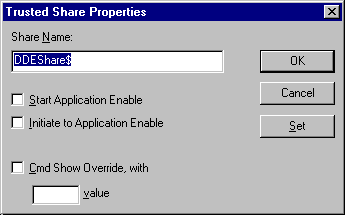
- Select the Start Application Enable check box.
- Select the Initiate to Application Enable check box. The Trusted Share Properties dialog should appear as shown:
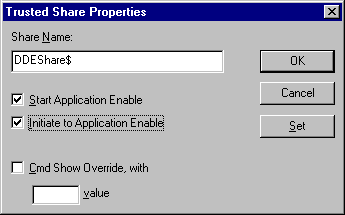
- Click Set to set the properties for the new share.
- Click OK. You are returned to the DDE Shares dialog.

- Click OK. You are returned to the DDE Share on WorkstationName dialog.

- Close the DDE Share on WorkstationName dialog using the Windows close button. You can now begin to configure the DDE Client tag and input/output tags within the VTScada application on the client PC.
Part 2: Configure a New DDE Tag to Communicate between VTScada and an External Application
The next step in communicating between VTScada (the client) and an external application (such as Microsoft Excel), is to create a new DDE tag.
- Run VTScada. The VAM opens.
- Select the VTScada application from which you wish to output data to the external application.
- Click the Run button. The application runs.
- Sign in to the application (if necessary) using your username and password.
- Navigate to the page upon which you wish to place your DDE-related tag widgets.
- Open the Tag Browser.
- Select DDE Client from the Types drop-down list.
- Click New. The New DDE Client Properties folder opens.
- Enter a name for the new DDE Client tag in the Name field.
- Enter an area for the new DDE Client tag in the Area field.
- Enter a description for the new DDE Client tag in the Description field. An example follows:
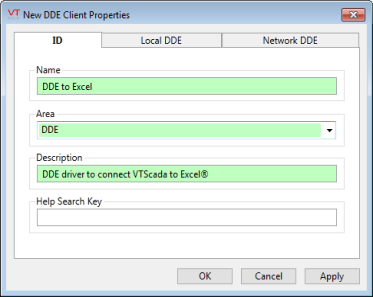
- Click the Network DDE tab.
- Enter the name of the server on which the DDE share created in Part 1 was created in the DDE Computer Name field.
- Enter the name of the new DDE share created in Part 1 (in this example, "DDEShare$"), followed by the extension .OLE.
- Click OK. The DDE Client tag properties folder closes and the information is saved in the tag properties database. You are returned to the Tag Browser where the name of the new DDE tag is displayed and selected.
- Click the Draw button and select the Comm Indicator widget. The Comm Indicator square is attached to the mouse pointer.
- Click to drop the Comm Indicator object on the page. The Comm Indicator dialog opens as shown.
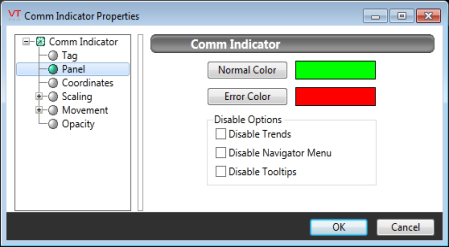
- Click OK.
The Comm Indicator object shows the status of communications between the DDE Client and the external application, by way of a changing color square. By default, green indicates communications are occurring, red indicates that communications have failed, and gray indicates that the tag is reading invalid (as it should be).
Part 3: Configure a New Input Tag to Read Data from the External Application
The next step in setting up VTScada as a DDE client is to configure a new input tag (either analog or digital) to read data from the external application on the remote PC via the DDE tag created in Part 2. This tag will help you to confirm that the data you will be outputting (via the output tag created in Part 4) is being transmitted.
- Open the Tag Browser.
- Click New and set the type to Analog Input.
- Enter a name for the new Analog Input tag in the Name field.
- Enter an area for the Analog Input tag in the Area field.
- Enter a description for the Analog Input tag in the Description field. The completed properties for the ID tab of the Analog Input tag properties folder should appear similar to the example shown:
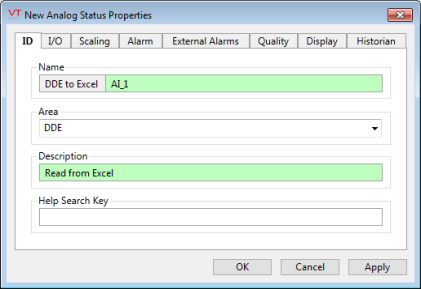
- Click the I/O tab.
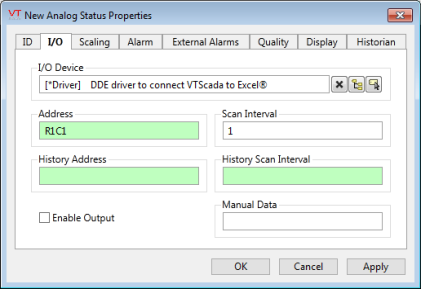
- Select the name of the DDE Client tag from the I/O device drop-down list.
- Enter the address of the location from which you wish to read data in the Address field. (In this example, the goal is to read data from row 1 cell 1 of the Excel spreadsheet, therefore enter "r1c1" in the Address field. The completed I/O tab should appear similar to the following image.
- Click OK. You are returned to the Tag Browser where the new Analog Input tag is displayed and selected.
- Close the Tag Browser.
- Open the Idea Studio and select the Widgets palette.
- Select one of the widgets that display the numeric value of the tag (i.e. Numeric Value or Meter1, Meter2, or Meter3), and drag it onto the page.
- Link the widget to your Analog Input tag.
- Configure the widget's display properties as you require.
Part 4: Configure a New Output Tag to Write Data to the External Application
The next step in setting up VTScada as a DDE client is to configure a new output tag (either analog or digital) to write data to the external application on the remote PC via the DDE tag created in Part 2.
- Open the Tag Browser.
- Click New and set the type to Analog Output.
- Enter a name for the new analog output tag in the Name field.
- Enter an area for the new analog output tag in the Area field.
- Enter a description for the new analog output tag in the Description field.
- Click the I/O tab. The properties of the I/O tab are displayed.
- Select the name of the DDE Client tag created in Part 2.
- Enter the address of the location to which you wish to write data in the Address field. (In this example, the goal is to write data to row 1 cell 1 of the Excel spreadsheet, therefore enter "r1c1" in the Address field.
- Click OK.
- Close the Tag Browser.
- Open the Idea Studio and select the Widgets palette.
- Expand the Analog Outputs group.
- Select the Numeric Entry widget and drag it onto the page.
- Link the widget to the tag you created.
- Configure the display properties as desired.
Part 5: Configure an Excel Spreadsheet with the Name as Specified for Your DDE Share Object, and Ensure the Path is Correctly Configured Within Excel
The configuration of VTScada as a DDE client is now almost complete. The only tasks remaining are to create a spreadsheet with the same name as was specified for your DDE share object, and ensure that the path is properly configured within Excel so that VTScada can locate it.
- Run Microsoft Excel.
- Create a new spreadsheet. Name this spreadsheet with the exact same name as you configured within your DDE share. For example, consider the DDE Share Properties dialog, shown in the following image. In the example DDE share object, the name of the Excel spreadsheet is given as "book1.xls", therefore, the spreadsheet must be named to match.
- Save the new spreadsheet in your application directory.

- Select Tools|Options in Excel's menu. The Options dialog opens.
- Click the General tab.
- Enter the path to your application directory in the Default File Location field.
- Click OK.
The configuration of VTScada as a DDE client is now complete. To output data values to Excel, simply enter a value in the Numeric Entry field (i.e. the widget you used for your output tag). When you press the Enter key, the value you entered in the Numeric Entry field for the analog output tag is transmitted to the Excel spreadsheet. If you look in the Excel spreadsheet, the cell you specified to write the data to should display the output number. The widget you used for the Analog Input tag should also display the number you entered, as it reads it back from the spreadsheet.
If the value you enter in the Excel spreadsheet is not registering, try stopping both Excel and your VTScada application, compile your VTScada application, then restart it and reenter the value you wish to output.
