
The Trihedral® Voice Modem Service Provider can log modem traffic in one of two ways:
- Standard logging, which is designed to mimic the Unimodem log file format
- Advanced Logging, which provides control over where the file is stored, and what information is logged. The files created by this option are stored in .csv format, meaning that you can open them with Microsoft Excel.
To enable modem logging:
- From the control panel of the Windows® operating system, open Phone and Modem options.
- Open the Advanced tab.
- Select the Trihedral Voice Modem Service Provider
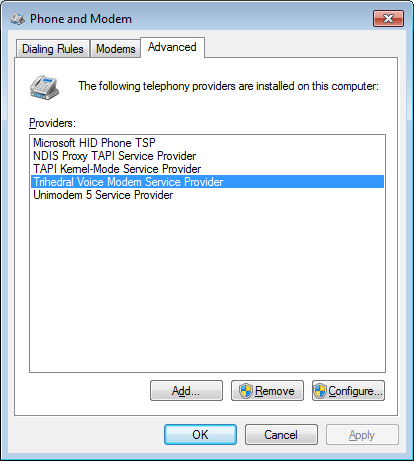
- Click, "Configure".
- Select your modem.

- Click on its Configure button.
The Modem Properties dialog will open.
- Open the Logging tab.
- Select the "Enable" box for either standard or advanced logging. See the following notes to help you decide which.
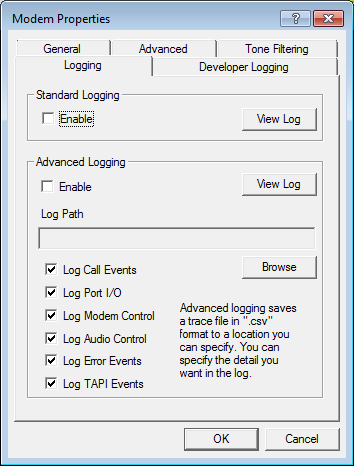
If selecting Advanced Logging, take care to select only the options that are necessary. The Audio Control, in particular, will result in the creation of very large log files. Instructions follow. In most cases, standard logging will prove sufficient.
Do not select options in the Developer Logging tab. These are intended for use only for short time periods and only when working with Trihedral Technical Support to resolve modem problems. While the Developer Logging options are enabled, overall performance of communications through the modem is impaired.
For Advanced Logging:
- Choose the folder path for storage of the logs by clicking the "Browse" button.
The folder selection dialog opens. The path chosen here is displayed in the Log Path field. - Make the Log Path accessible to the "NETWORK SERVICE" user, which is a virtual user account used by the operating system to run the Trihedral Voice Modem Service. This is done using the tools provided by Microsoft Windows as follows:
- Navigate to the selected folder using Windows Explorer and right-click on the folder, selecting Properties from the droplist that opens.
- In Properties, click the Security tab.
- In the Security tab, click Edit.
The Permissions dialog opens. - Click, Add...
The user selection dialog opens. This dialog has a single data entry field. - Type "NETWORK SERVICE" (all caps, include the space but not the quotes) into the data entry field, then click OK.
The User Selection dialog closes. The Permissions dialog remains open. - Ensure that "NETWORK SERVICE" is selected in the box in the top half of the Permissions dialog.
At the bottom of the Permissions dialog is a list of permissions including Full control, Modify, etc. - Ensure that there are no selected check boxes in the Deny column and that the check boxes in the Allow column are selected for at least the following permissions:
- List folder contents
- Read
- Write
- Click OK on the Permissions dialog and the Properties dialog.
